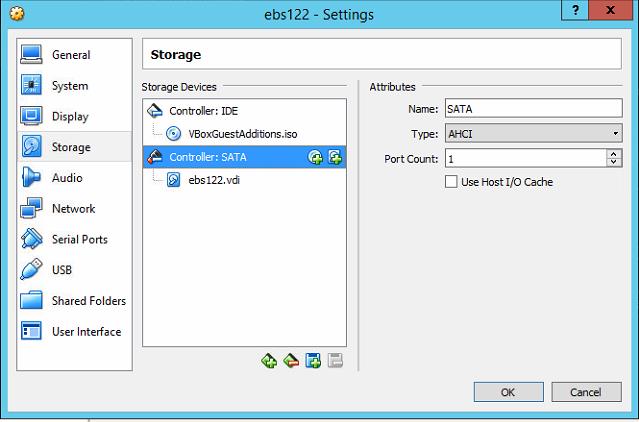
Here, I describe how to allocate more space by adding a virtual drive to a Virtual Box, running on a Windows machine. The Guest VirtualBox is running the Oracle Linux 6.4.
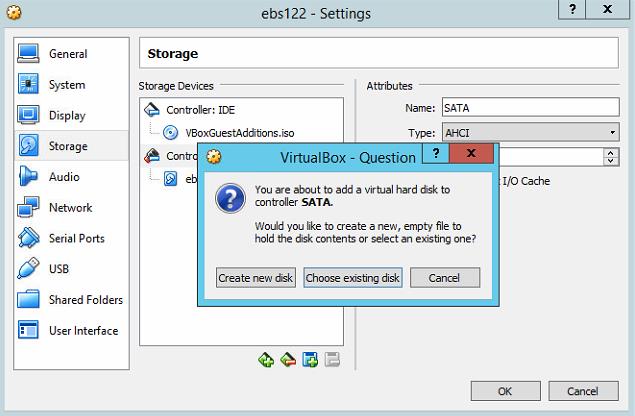
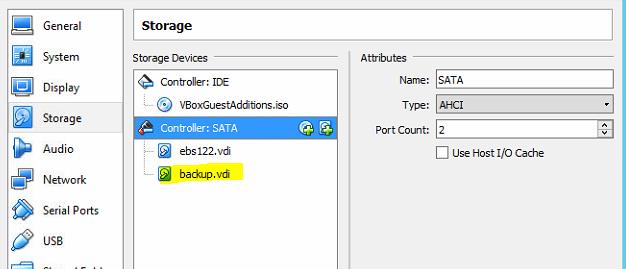
In short, the steps include first adding a Virtual drive via the Oracle VM Virtual Box Manager, identifying the device on the Linux Virtual Machine, partition it, format and then mount it.
Turn on the VirtualBox now and switch to the root user.
Then use fdisk utility to get list of hard drives.
[root@ebs122 ~]# fdisk -l
Disk /dev/sda: 859.0 GB, 858993459200 bytes
255 heads, 63 sectors/track, 104433 cylinders
Units = cylinders of 16065 * 512 = 8225280 bytes
Sector size (logical/physical): 512 bytes / 512 bytes
I/O size (minimum/optimal): 512 bytes / 512 bytes
Disk identifier: 0x00085f16
Device Boot Start End Blocks Id System
/dev/sda1 1 35696 286720000 83 Linux
/dev/sda2 35696 67566 256000000 83 Linux
/dev/sda3 67566 90513 184320000 83 Linux
/dev/sda4 90513 104434 111819776 5 Extended
/dev/sda5 90513 96250 46080000 82 Linux swap / Solaris
/dev/sda6 * 96250 99437 25600000 83 Linux
/dev/sda7 99437 104434 40136704 83 Linux
Disk /dev/sdb: 536.9 GB, 536870912000 bytes
255 heads, 63 sectors/track, 65270 cylinders
Units = cylinders of 16065 * 512 = 8225280 bytes
Sector size (logical/physical): 512 bytes / 512 bytes
I/O size (minimum/optimal): 512 bytes / 512 bytes
Disk identifier: 0x00000000
[root@ebs122 ~]#
From the first block you can clearly see that we have two hard drives i.e. /dev/sda and /dev/sdb. You can also see that /dev/sda has been formatted and mounted using logical volume management. This was surely done when you created the VirtualBox or when the template was created, as it is the default way Linux formats the hard drives.
We need to partition the /dev/sdb device.
Use the following command to partition the device.
fdisk /dev/sdb
Follow the screen instructions as shown below.
[root@ebs122 ~]# fdisk /dev/sdb
Device contains neither a valid DOS partition table, nor Sun, SGI or OSF disklabel
Building a new DOS disklabel with disk identifier 0x23802974.
Changes will remain in memory only, until you decide to write them.
After that, of course, the previous content won't be recoverable.
Warning: invalid flag 0x0000 of partition table 4 will be corrected by w(rite)
WARNING: DOS-compatible mode is deprecated. It's strongly recommended to
switch off the mode (command 'c') and change display units to
sectors (command 'u').
Command (m for help): n
Command action
e extended
p primary partition (1-4)
p
Partition number (1-4): 1
First cylinder (1-65270, default 1):
Using default value 1
Last cylinder, +cylinders or +size{K,M,G} (1-65270, default 65270):
Using default value 65270
Command (m for help): w
The partition table has been altered!
Calling ioctl() to re-read partition table.
Syncing disks.
[root@ebs122 ~]#
We have used ‘n’ to create a new partition, p to create the partition as primary, 1 to specify the partition number and used defaults for begin and end range for partition size.
Finally ‘w’ to make changes permanent.
Query the partition table again.
[root@ebs122 ~]# fdisk -l
Disk /dev/sda: 859.0 GB, 858993459200 bytes
255 heads, 63 sectors/track, 104433 cylinders
Units = cylinders of 16065 * 512 = 8225280 bytes
Sector size (logical/physical): 512 bytes / 512 bytes
I/O size (minimum/optimal): 512 bytes / 512 bytes
Disk identifier: 0x00085f16
Device Boot Start End Blocks Id System
/dev/sda1 1 35696 286720000 83 Linux
/dev/sda2 35696 67566 256000000 83 Linux
/dev/sda3 67566 90513 184320000 83 Linux
/dev/sda4 90513 104434 111819776 5 Extended
/dev/sda5 90513 96250 46080000 82 Linux swap / Solaris
/dev/sda6 * 96250 99437 25600000 83 Linux
/dev/sda7 99437 104434 40136704 83 Linux
Disk /dev/sdb: 536.9 GB, 536870912000 bytes
255 heads, 63 sectors/track, 65270 cylinders
Units = cylinders of 16065 * 512 = 8225280 bytes
Sector size (logical/physical): 512 bytes / 512 bytes
I/O size (minimum/optimal): 512 bytes / 512 bytes
Disk identifier: 0x23802974
Device Boot Start End Blocks Id System
/dev/sdb1 1 65270 524281243+ 83 Linux
[root@ebs122 ~]#
Format the Partition
Next step is to format the partition. Normally Linux uses ext4 now a day, so we can use that. You can format using the following command.
[root@ebs122 ~]# mkfs.ext4 /dev/sdb1
mke2fs 1.41.12 (17-May-2010)
Filesystem label=
OS type: Linux
Block size=4096 (log=2)
Fragment size=4096 (log=2)
Stride=0 blocks, Stripe width=0 blocks
32768000 inodes, 131070310 blocks
6553515 blocks (5.00%) reserved for the super user
First data block=0
Maximum filesystem blocks=4294967296
4000 block groups
32768 blocks per group, 32768 fragments per group
8192 inodes per group
Superblock backups stored on blocks:
32768, 98304, 163840, 229376, 294912, 819200, 884736, 1605632, 2654208,
4096000, 7962624, 11239424, 20480000, 23887872, 71663616, 78675968,
102400000
Writing inode tables: done
Creating journal (32768 blocks): done
Writing superblocks and filesystem accounting information: done
This filesystem will be automatically checked every 33 mounts or
180 days, whichever comes first. Use tune2fs -c or -i to override.
[root@ebs122 ~]#
Mounting the Partition
This partition can now be mounted to location of your choosing. For example if you want to mount this under /EBSBKP. Here the steps.
[root@ebs122 ~]# mkdir -p /EBSBKP
[root@ebs122 ~]#
[root@ebs122 ~]# mount /dev/sdb1 /EBSBKP
[root@ebs122 ~]# df -h /EBSBKP
Filesystem Size Used Avail Use% Mounted on
/dev/sdb1 493G 198M 467G 1% /EBSBKP
[root@ebs122 ~]#
You don’t have to do all these steps again except for very last mount command. It will be required on every reboot.
You can avoid that as well by putting the following entry into /etc/fstab file.
[root@ebs122 ~]# grep -i /EBSBKP /etc/fstab
/dev/sdb1 /EBSBKP ext4 defaults 1 2
[root@ebs122 ~]#